
Requirements and basic commands
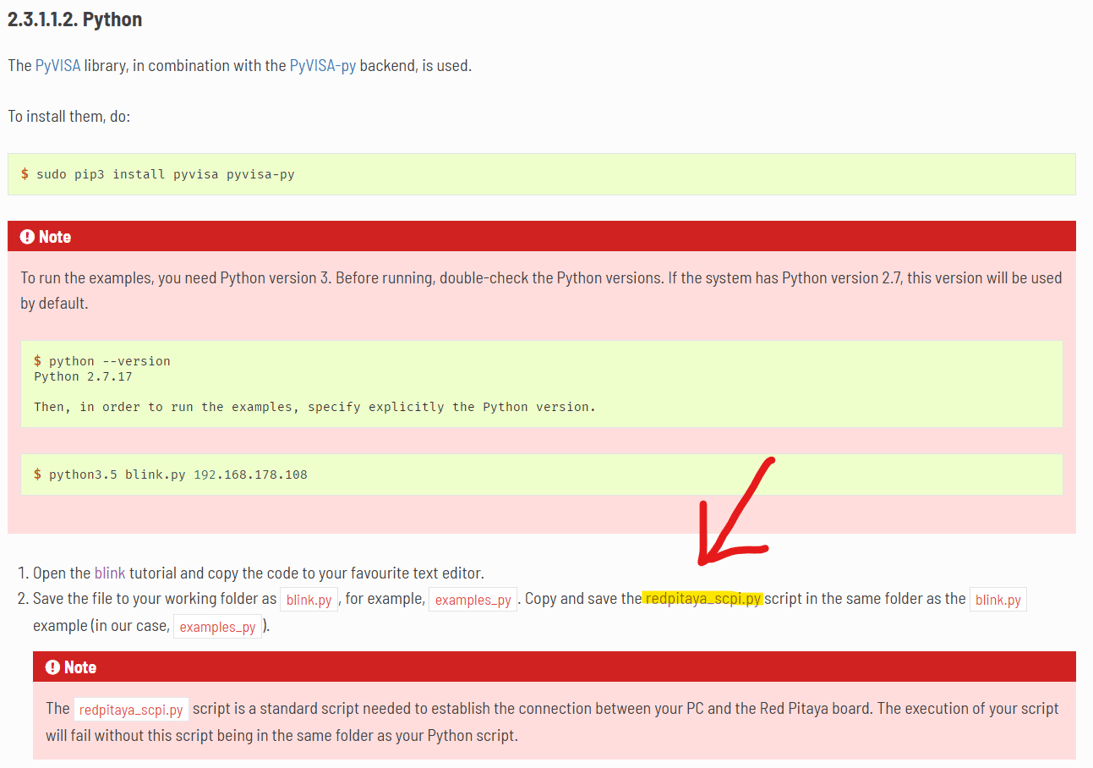
For Python, you will need to install the PyVISA library in combination with the PyVISA-py backend. Additionally, you need to copy the redpitaya_scpi.py script from our website. The redpitaya_scpi library needs to be in the same folder as your code as your Python script.
Also, please install Numpy, Matplotlib, Pandas, and Scipy libraries.
For MATLAB, you do not need anything, but it is recommended that you have the Signal Processing and Instrument control toolboxes installed so that this won’t take away your time during the hackathon. Please install any other toolbox you deem necessary.
NOTE: Please use MATLAB version 2022a or older. MATLAB 2022b has introduced syntax changes that we are yet to tackle.
So, let’s talk about syntax first and then we will get to the fun part:
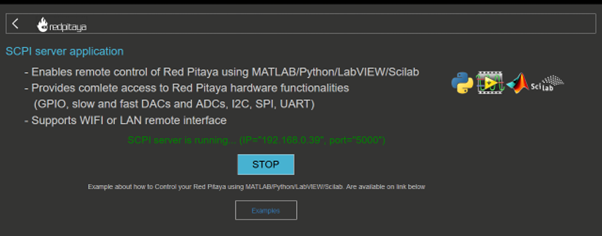
Firstly, we need to establish socket communication with our Red Pitaya. Head to your Red Pitaya’s main webpage, under the development section, and turn on the SCPI server.
For MATLAB, you do not need anything, but it is recommended that you have the Signal Processing and Instrument control toolboxes installed so that this won’t take away your time during the hackathon. Please install any other toolbox you deem necessary.
NOTE: Please use MATLAB version 2022a or older. MATLAB 2022b has introduced syntax changes that we are yet to tackle.
So, let’s talk about syntax first and then we will get to the fun part:
Firstly, we need to establish socket communication with our Red Pitaya. Head to your Red Pitaya’s main webpage, under the development section, and turn on the SCPI server.
Remember or write down the IP address and port number
Python
Please include the following libraries:
import numpy as np
import math
import time
from matplotlib import pyplot as plt

import redpitaya_scpi as scpi
And write the IP address of your Red Pitaya into a variable.
Then establish the socket communication with:
Then establish the socket communication with:
rp_s = scpi.scpi(IP)
MATLAB
Save the IP and port number as two variables and establish a TCP client communication:
RP = tcpclient(IP, port);       % creates a TCP client object
RP.ByteOrder = "big-endian";
configureTerminator(RP, 'CR/LF');   % defines the line terminator (end sequence of input characters)
flush(RP);         % clears input/output buffers
Python basic functions
tx_txt("<command>")- sending SCPI commands to Red Pitaya
rx_txt()– receiving data from Red Pitaya
rx_arb()– receiving binary data
txrx_txt(“<command>”)– sending a command and receiving a short reply
close()– close socket communication
MATLAB basic functions
These are commands used for TCP client communication
writeline(“<command>”)- sending string commands to Red Pitaya
readline()– receiving data from Red Pitaya
writeread(“<command>”)– sending a command and receiving data
read()– reading binary data
clear RP– closes socket communication
The full list of functions for MATLAB is available here:
https://www.mathworks.com/help/matlab/ref/tcpclient.html
https://www.mathworks.com/help/matlab/ref/tcpclient.html
SCPI command breakdown
The SCPI commands are always sent as strings (ASCII) even if they include numbers.
The full list of SCPI commands can be found here:
https://redpitaya.readthedocs.io/en/latest/appsFeatures/remoteControl/remoteControl.html#scpi-server-matlab-labview-scilab-or-python
The SCPI commands all follow the same basic rule/structure:
<Peripheral unit>:<Part of peripheral unit>: <function> <settings><settings>
To turn on LED0, use the following command:
DIG:PIN LED01
For example, setting generator 1 function to sine:
SOUR1:FUNC SINE
A question mark indicates that Red Pitaya should send you some data (get the acquired data from input 1):
ACQ:SOUR1:DATA?
NOTE: Be mindful of the space between the command and the parameters.
Testing the setup
Now let’s test if everything is working as intended. Use the following code to blink LED0.
Python
import time
import redpitaya_scpi as scpi

IP = '192.168.0.32'
rp_s = scpi.scpi(IP)         # Establishing socket communication with Red Pitaya

for i in range(0,10,1):
	rp_s.tx_txt('DIG:PIN LED0,1')  # Turn LED0 on
	time.sleep(1)
	rp_s.tx_txt('DIG:PIN LED0,0')  # Turn LED0 off
	time.sleep(1)

rp_s.close()                 # Close socket communication
MATLAB
IP = ('192.168.0.23');                  % Input IP of your Red Pitaya...
port = 5000;
RP = tcpclient(IP, port);               % creates a TCP client object

RP.ByteOrder = "big-endian";
configureTerminator(RP, 'CR/LF');       % defines the line terminator (end sequence of input characters)


for i=1:10
    writeline(RP,'DIG:PIN LED1,1');
    pause(1);
    writeline(RP,'DIG:PIN LED1,0');
    pause(1);
end

clear RP;
 Made with Bullet